Month: January 2016
Urban Decay Electric Palette: 3 Looks
 I’ve been lusting after the UD Electric palette for quite some time, (can you blame me? – just look at those colours!) and last week I finally took the plunge. At £38 RRP I just couldn’t justify the purchase as I still wasn’t entirely convinced I’d have the confidence to wear the colours. Thanks to the January sales, I managed to pick this up for £28.50 (still a bit on the pricey side if you ask me) from Beauty Bay. They also offer free 2 day tracked delivery when you spend over £15, so it was in my hands only 2 short days later.

As you can see, the colours in this palette are just incredible- my favourites being Gonzo, Jilted and Urban. I was a little disappointed with Trash as I expected it to be a lot more yellowey than it actually is, and it is a little more on the green side. All of the colours have amazing pigmentation- you really don’t need to use much to get a bright and bold application. As with most eyeshadows, using your finger rather a brush will give you a better coverage, but even with a brush these are pretty impressive.
I’ve heard a lot of people talk about staining they’ve experienced when using some of the colours (Gonzo and Savage- I’m looking at you) and I definitely have to push the importance of using an eye primer (I used the Make Up Academy Pro Base Eye Primer). Not only will it help the shadows to go on smoother and last a lot longer, but it will also help to protect your lids from staining. Unfortunately, I learnt this one the hard way when I first experimented with it and really struggled to get the last traces of Savage from my eyelids.
Look 1:


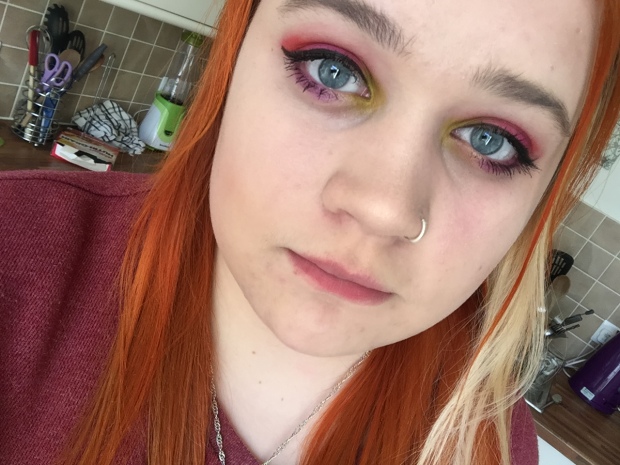
I think out of all 3 looks I have created, this is by far my favourite. First off I blended Chaos into the crease using my Real Techniques Deluxe Crease Brush. I then applied Gonzo to the entirety of my eyelid using my fingers, ensuring that I had a solid coverage. Using the smaller end of the brush provided in the palette, I applied Savage to the inner corner of my eye, blending it into the blue. Next I took Urban on my Real Techniques 201 brush and blended it into the crease of my eye as well as the outer V. I wanted a dramatic look, so I left the corners unblended to create a harsh line. I then took Chaos again and applied it on the outer lower lash line, and Savage on the inner lash line. These colours didn’t have much fall out, but I took a damp cotton bud and ran it under my eye to tidy it up, and I then applied the rest of my make up.

(Sorry for the poor quality picture! I used Make Up Revolution Lipsticks in Crime and Scandalous Depraved!)
Look 2:


This look is slightly more bold, but still ended up being a look I really liked! I started by putting Slowburn into the crease, once again using my Real Techniques Deluxe Crease brush. I used my Real Techniques Base Shadow brush to apply Savage all over the lid, blending it into the crease alongside Slowburn. I applied Trash to the inner corner and inner lower lash line, and Urban on the lower lash line.
Look 3:


This look is a lot more neutral compared to the other two, and more wearable. I took my MAC 217 Blending brush and applied Savage to the crease. I then damped my Real Techniques Base Shadow brush with some Make Up Revolution Pro Fix Spray and applied Revolt on my lid. This colour is less pigmented than the others, so using this shade while damp will give you a much stronger colour. I then took Jilted on the crease, in order to blend Savage and Revolt together and give the look more depth. Finally, I applied Slowburn on the lower lash line.

For my base make up for all 3 looks I used the Loreal Infallible Mattifying Base Primer, MAC Studio Fix Fluid in the shade NC15, Collection Lasting Perfection Concealer in Fair, and Rimmel Clear Complexion Powder.
To put a little bit more colour onto my face I used Bourjois Delice De Poudre Duo Bronzer, and Rimmel Lasting Finish Soft Colour in Pink Rose.
For my eyes I either used Maybelline’s Lash Sensational, or Benefit’s Rollerlash mascara, and Loreal’s Super Liner Perfect Slim eyeliner.
Finally, I sprayed Make Up Revolution Pro Fix Spray to fix my make up and help it to last longer.
