Massive Make Up Geek Haul

IMG_9302

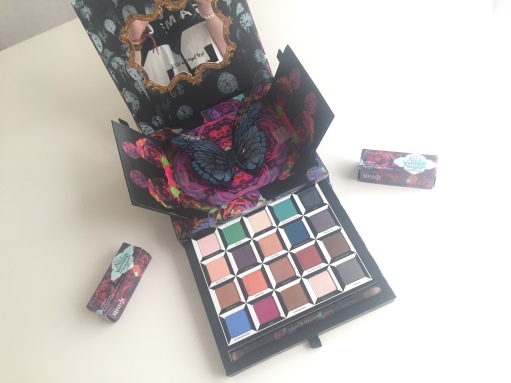
I have seen a lot of hype surrounding Make Up Geek on the beauty scene for a long while, and I thought it was about time I finally checked them out. As most things, Make Up Geek is a brand that isn’t the easiest to get hold of in the UK, but I found that Beauty Bay were stocking some of the colours. Naturally as soon as I started browsing the website I found myself unable to stop adding colours to my basket and before I knew it I’d ended up with this huge haul!

Before I get into the eyeshadow, I just wanted to take a moment to once again talk about how great Beauty Bay’s customer service is. I qualified for free next day delivery with my order, and was handed my package the next day. Unfortunately, one of my eyeshadows arrived smashed,  but after contacting them they arranged for another one to be sent out to me and once again, it was with me the very next day. I can’t rave enough about the Beauty Bay and if you live in the UK I would very much recommend that you check them out!

IMG_9341

From Left to Right: Pillow Talk, Caitlin Rose, Masquerade, Blacklight, Wisteria and Hotpants. I had heard that Pillow Talk was a dupe for MAC’s Satin Taupe which is a colour that has been on my wishlist for the longest time, and whilst I can’t comment on how similar they are, I am definitely loving Pillow Talk! Blacklight is the most amazing duo-chrome shade- a mix between silver, purple, pink- I can’t even find a way to describe it! I’ve been using it as an inner highlight and I just think it looks so pretty! I was slightly disappointed with Caitlin Rose and it is not nearly as pigmented as I was expecting it to be, but it is still very pretty. Wisteria and Hot Pants are both very pinky shades, something that I don’t usually go for but I have found that they both work so well together!

IMG_9389.jpg

From Left to Right; Bitten, Burlesque, Cherry Cola and Roulette. Bitten was the colour that I was most excited about buying and so far I have found I have a very love-hate relationship with it. I have been really enjoying brown-red smokey eyes lately, and this is the perfect colour to give it a bit more of a reddy tone. It is however quite harsh and I sometimes find it hard to properly blend, but I am sure that it is something I will get better at with practise. Roulette is a really nice shade, and when I bought it I was really expecting to love it that much because I thought it would be just your bog standard coppery colour but I am really enjoying it, and it is SO pigmented.

IMG_9390.jpg

From Left to Right; Mermaid, Poolside and Neptune. I have been very keen on bold, bright make up lately- especially blues and purples- so I just had to get my hands on some of these! Mermaid is a lot more green than what I was expecting but it is still super nice! I was disappointed with Neptune as it really doesn’t seem very pigmented at all, but I’m sure once I use it along with other shadows it’ll look much better.

I also bought a Large Z Palette that holds 27 (I could be wrong) eyeshadow pans as I needed a place to put them all, and I also have several other eyeshadows that need deporting. I was a little skeptical at the idea of the Z Palette as I thought that the eyeshadow pans would be sliding about all over the place and would fall out easily but so far that doesn’t seem to be the case at all! I think it is a really clever and easy to way to keep all your eyeshadows in one place.

Alongside my Make Up Geek order, I also purchased the Small Fan Brush from Spectrum Cosmetics and I am IN LOVE. It applies my highlighter so nicely and the brush itself is so pretty! It only cost £5 as well so very inexpensive. I will definitely be purchasing some of the other brushes in the collection!

IMG_9309

This is one of the make up looks I created using Bitten, Cherry Cola, Burlesque, Roulette and Blacklight and I absolutely love it!

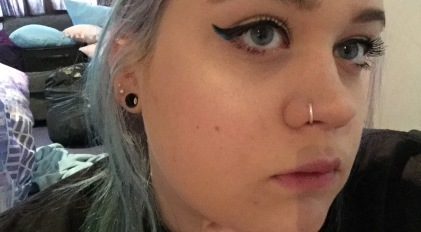
I tried out this look yesterday (right after dying my hair!) and I really liked that too. I used Pillow Talk, Caitlin Rose, Masquerade and Blacklight.

Over to you: Have you tried any Make Up Geek products? What are your favourites?

#LoveIsLove

IMG_9267

In light of the recent events, I decided to create a fun eye look to show my support to the LGBTQIA community. Love is Love and nobody should ever be made to feel victimised, ashamed or attacked for their sexuality. Each and every one of us has the right to love who we love with no consequences, no judgement and no fear. Unfortunately the world still has a very long way to go but I stand with and support EVERY member of the LGBTQIA community. You matter, you’re valid, your rights are important. We’re here fighting with you. Be proud of who you are.

The eyeshadows used: NYX Butterscotch, Slowburn/Savage/Urban/Jilted/Gonzo from the Urban Decay Electric Palette, Mad Hatter/Metamorphosis from Urban Decay Through The Looking Glass.

Mini Make Up For Ever Haul & First Impressions

IMG_9175.JPG

I went shopping in Westfields with my friends last week and walking past Debenhams I spotted a Make Up For Ever stand. Needless to say I got incredibly excited and spend the best part of 30 minutes inside (sorry Lyss) testing all of the products. I was under the impression that the only place that was currently stocking Make Up Forever in the UK was the Oxford Street Debenhams store but I am very happy to see that the White City one does too!

I only picked up a few bits because I was trying not to go too mad and spend all of my money at once (story of my life) but I was pretty happy with my purchases. Firstly, I picked up the Base Hydrating Primer. I can’t remember if I’ve said it before in one of my previous posts but I have been wanting to try this for the longest time. I religiously use the Make Up Forever Ultra HD Foundation and have been wanting to try it out to see if the primer would help my foundation apply better.

My overall first impressions of this product have been positive. The consistency of this primer is unlike anything I have ever tried before. Usually primers tend to have a silcone-y  feel to them and can be greasy and quite thick. This one isn’t like that at all! It’s so moisturising and hydrating and just feels so lovely on the skin. It’s more of a moisturiser than a primer I feel. I was worried about how well it would work as a primer because I thought that my make up wouldn’t stick to it as well as other primers but I haven’t noticed this being the case. At the time of writing this I’ve only used it twice so I can’t properly comment on how good it is, but so far I’m really liking it! My one issue with it is that it dries very quickly so can be hard to really blend into your skin, but you just have to work fast. I do feel like it creates a nice base for your foundation and it must be doing your skin a world of good in the process. I recommend giving it a try if, like me, you have dry skin.

The other two products I picked up were the Aqua Liners. I have heard so many people talk about how great these eyeliners are and I definitely agree with the hype! I picked up the black colour and a really pretty blue colour too. With a black liner you can’t really go wrong, and this is one of the blackest eyeliners I have ever owned! It is so pigmented and smooth to apply. The brush is really nice too- you can get super close to the waterline and it’s super thin too so you can get a really nice precise line. Sometimes I find that eyeliner brushes can be really flimsy and bendy which makes it incredibly hard to get a nice sharp line but this definitely not the case. It is also very easy to remove which is a massive plus as sometimes eye make up can be really stubborn. Having said that, this eyeliner has some insane staying power. When I swatched these on my hands in the shop they stayed on ALL day- and I was out for a good 8 hours. When I got home I tried to wash it off with water and they wouldn’t budge- didn’t even smudge!

The blue colour on the other hand is a lot harder to remove. The few times I have used it I found that it stained my skin a little after using my micellar water to remove it, but after washing my face and completing my whole skincare routine it had gone. Nothing too extreme, but is still a little annoying! I’ve been using the blue to add a little pop of colour on my eyeliner flicks and I’ve had so many compliments on it!

IMG_9178

These eyeliners retail at £16 point each which is pretty pricey but I personally think they are more than worth the money! I’ve been eyeing up the purple one as well, so I might treat myself to that next time I am in Westfields. I have found that these eyeliners have really helped me to get a great wing so if you are one of those people who struggle to perfect your cat-eye I definitely recommend these products!

IMG_9196

Can we just take a moment to appreciate how adorable the dog filter on snapchat is?! (also how good my eyeliner went on that day)

Over to you: Have you tried any of these products? What are your favourite Make Up For Ever products?

Urban Decay’s Alice Through The Looking Glass: 4 Looks

The launch of the Alice Through The Looking Glass collection from Urban Decay saw a lot of hype in the beauty world these past few weeks, and here is a few of my favourite looks I have created using the palette! If you haven’t read my review on this palette yet, be sure to check it out here!

Look 1

This was the first look I created using this palette and I do really love it! I used the shade Time in my crease and very quickly realised how pigmented and it was and had to spend forever blending it out. A little product goes a very long way with this eyeshadow so use it sparingly! After I finally got it blended I used Mirror on my lid, and then packed a little of Dream On in the centre. I found that Dream On wasn’t very pigmented at all, so I had to spray my brush with some Mac Fix + in order to get it to show up on my skin! Finally, I took Royal Flush (probably my most used shade in the whole palette!) and put it in my inner corner. This look was really simple to create and is a really nice smokey eye to wear out.

Look 2 

This look is probably my least favourite out of all 4 featured in this blog post but I thought I might as well include it! I used Salazen Grum in my crease, and again, found it very hard to blend. It might just be that I am being too ambitious using very bold colours as a crease colour but I just found it went everywhere. Luckily, it was nothing a cotton bud couldn’t fix, but still a bit annoying! I really love this colour on the lid, but I’m not so sure it works in this look! I then used Cake on my outer V to brighten thing up a bit and make the look a little more bold. Paradox, which is a beautiful bright orange from the Mad Hatter’s section of the palette, went on my lid and I think this colour really brought all the shades together. I created a similar look to this one using a Makeup Revolution palette a few months back, but this one was much more red. I then used Royal Flush as an inner highlight colour (yes, again! I think I use this in all 4 looks oops).

Look 3 

I really love this look as it is a very subtle smokey brown that can be worn for just about any occasion! I know these images aren’t the best quality and it is hard to see the eyeshadow but when I took them I didn’t think I was going to be using them for a blog post, sorry! I used a mixture of Dormouse and Chessboard in my crease, and placed Kingdom on the lid. I took my Mac 217 brush and really blended all three colours together. I then used a tiny bit of Chronosphere on my outer V to try and darken the look a bit, but in the end decided I liked it the way it was! Once again, I used Royal Flush as highlight, and that was the finished look! I’ve worn this one several times since I created it for the first time, and it’s become one of my everyday looks.

Look 4

This final look is my favourite! I love using fun bold colours and this one was definitely bold! I started by running the shade Gone Mad through my crease, and adding a little Dream On to the mix. I then sprayed my brush with Mac Fix + and placed Cake on my lid. I definitely think this shade needs to either be used wet or with a bit of Fix + to maximise the result it gives. I then took Metamorphosis and placed it on my inner corner, and blended it into Cake. I think if I was to create this look again I would use more Metamorphosis as it it just such a pretty colour! I also dragged both Cake and Metamorphosis under my eye to make it bolder and a more intense look.

I still have a lot more playing around with this palette to be doing, and a lot more looks to create, but I hoped you enjoyed seeing some of the ones I have created so far! I think the next look I want to try out is a blue/green using Hatter, Heads Will Roll and Bandersnatch, but I am waiting for a day where I really have the time to be experimenting with those colours seeing as they are so bright!

Over to you: What was your favourite look I created? What looks have you created using the palette? 

Urban Decay’s Alice Through The Looking Glass Palette: Worth The Hype?

IMG_8789.JPG

If you know anything about me then you know three of my favourite things in life are eyeshadow, butterflies and Alice in Wonderland. When Urban Decay announced the launch of their new palette, Alice Through The Looking Glass, in partnership with Disney, I think I just about died from excitement. I knew that I had to get my hands on it.

I’ve already seen several blog posts about this palette, and despite getting this palette nearly a month ago now I’m somehow only just finding the time to blog about it. Unfortunately, life just keeps getting in the way! As a side note- I am going to be changing my upload day from Friday to Wednesday as I’m finding Friday is just not working for me as I now work Thursday-Sunday. So be sure to check my blog every Wednesday at 5:30pm (GMT) for new posts!

I bought this palette direct from Urban Decay’s website on the UK release day (Thursday 5th May) along with two of the lipsticks- Mad Hatter and Alice. I forked out for the next day delivery as I was going to be staying at my grandparents for the next few days, and I wanted to get it as quickly as I could (I know- I’m too impatient!) but unfortunately, despite ordering at 9am- way before the cut off time of 12pm- they didn’t send out my parcel until Friday afternoon, bearing in mind it should have been delivered that day, and I didn’t end up receiving the package until Monday. At this point, I had left my grandparents and gone back home so I had to make an extra trip back there to pick it up the following Wednesday so it would have been easier (and cheaper) to have just stuck to the free standard delivery they offer. I wasn’t too impressed with Urban Decay’s customer service either, as I still am yet to hear back from them (it is now the 30th as I write this) when I requested that I was refunded the money I paid for next day delivery seeing as it arrived 4 days after I’d placed my order. So needless to say I won’t be using that service again!

But anyway, I’m getting off topic. Back to the palette itself. The limited edition palette retailed for £43 and comes with 20 shades. The idea behind the collection is that each column is dedicated to a character- Alice, Mad Hatter, Iracebeth, Mirana and Time. Each character is given 4 eyeshadow shades to help you recreate their looks, alongside a lipstick. I only bought Alice and Mad Hatter since at £16 each (If I can remember correctly- I could be wrong) I couldn’t justify buying all 5, as much as I wanted to!

The packaging of this eyeshadow palette is absolutely insane. The top lifts open to display a massive mirror with the words “We’re all mad here” written along the bottom. The packaging itself is a matte black and on top of the two flaps the quote “I’m not strange, weird, off nor crazy, my reality is just different from yours” (one of my favourites!) is written in gold. Once you lift the flaps, you are met with a beautiful blue butterfly that pops up.

I absolutely love this, the packaging is so pretty and clever, interesting and completely different to something I ever seen before, which is exactly what you want from a limited edition product. I have to admit, it is incredibly over the top and even a bit annoying but I can deal with it. The eyeshadows are located in the bottom of the palette, which you pull out from underneath the main compartment where the butterfly is. This can pull all the way out and I have found that sometimes it is much easier to do this when you are using the eyeshadows as the rest of the packaging is heavy and gets in the way.

The eyeshadows themselves are where I was a little disappointed. I have found that for some of them the pigmentation isn’t the best, which is surprising from Urban Decay. Colours such as Dream On, Cake and Gone Mad- the brighter shades in the palette- aren’t very pigmented which is a shame since these are the colours that draw you in the most, but having said that I haven’t really had the time to properly play around with them yet. I’m sure if you spray a bit of the Mac Fix + on your brush before hand it’ll help make them stand out a bit more.

My favourite shades are Metamorphis: a pretty baby blue, Salazen Grum: a coppery-red, Royal Flush: the perfect pinky-champagne highlight colour, Dormouse: a matte brown with tiny specks of glitter and Paradox: a orangey brown shimmer. I also really like Time: a navy blue shimmer, and Mirror: a silver glitter- and these two together create the perfect smokey eye.

So, is it worth the hype? Overall I do love the palette, but is it only because I love Alice In Wonderland? Admittedly, I bought this palette because of this reason only, and because I usually love Urban Decay’s products. If I’d have seen these selection of colours in any other palette I probably wouldn’t have bought it, if I’m being totally honest. At £43 it is quite expensive, and I definitely think you’re paying for the packaging (as beautiful as it is!) and the Disney label. That being said, I do really love several of the colours inside and I haven’t really given it enough of a chance to make a proper decision. I also thought that the colours selected for Mad Hatter would be much brighter, bolder and more fun than they are, but I do still like the colours- especially Paradox. I think all in all, the palette is worth the money- you do get 20 eyeshadows and it is limited edition. I think that being a fan of Alice In Wonderland will definitely influence whether you purchase it or not.

The lipsticks are a whole other story. I’m not really that much of a lipstick fan-I watch other people wearing them and think they look amazing but when it comes to myself I think I look ridiculous in them. Unfortunately, this is the case with the ones I bought.

Whilst I absolutely love them- especially the Mad Hatter shade- I am unsure when I will actually wear them out of the house. The Mad Hatter is a crazy bold purple with a metallic finish, and is truly incredible. It matches my hair too! I think if you wear this one you’d have to go for a simple eye look, rather than using the brighter shades in the palette. I 100% recommend this lipstick, but if like me, you aren’t a confident lipstick wearer, I’d give it a miss.

The Alice one however, I’ve actually been wearing. It is a sheer nude, which has a slight peachy hint. When swatched on the back of your hand it is very orangey, however on your lips it looks more pink. It is a really hard shade to describe! I really like this lipstick as it gives you a really subtle shine to your lips and can be worn with just about any eye look- weather you opt for a warm smokey brown, a natural pink or a crazy purple. I think this is one of those lipsticks everybody needs in their collection. They are both very long wearing and apply really nicely. The consistency is smooth and creamy and isn’t patchy at all. The Alice shade does cling to your lips if they are a little more on the dry side so just watch out for that. The packaging for them both is stunning as well- black with a colourful floral print which matches the packing on the palette. They look lovely sitting in my acrylic make up storage!

Overall, I don’t regret buying these products, however I do think they may become some of the more less used items in my make up collection once the initial hype wears off. Next weeks post is going to be a selection of some of the looks I’ve created using this palette, so be sure to keep an eye out for that!

Over to you: Do you have this palette? What are your opinions?